Introduction
The XO Platform helps teams rapidly develop their Virtual Assistants using various features, including:
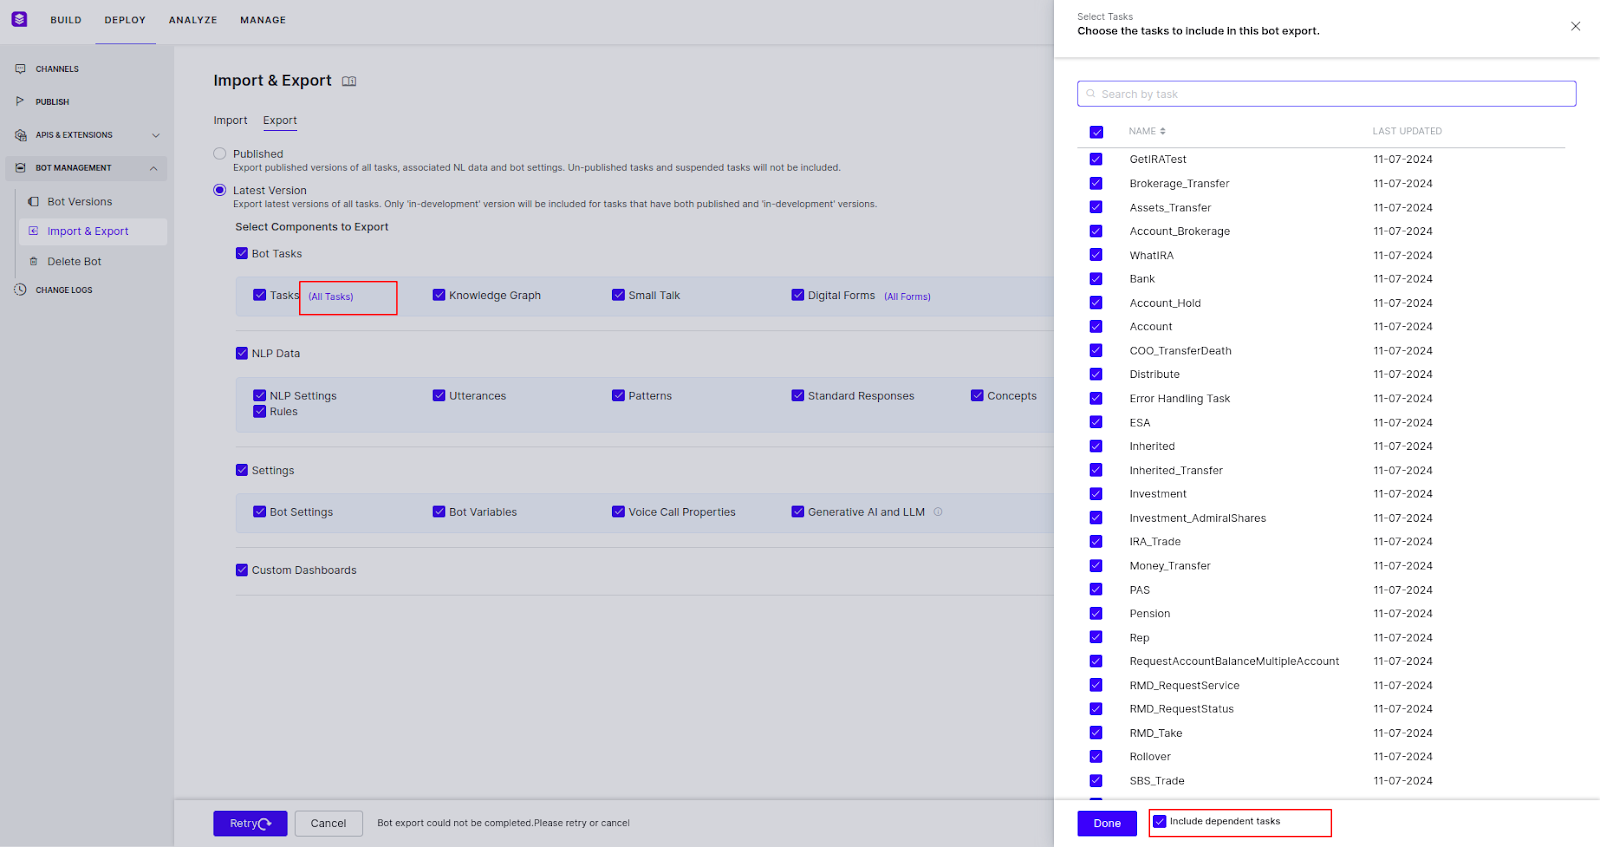
- Full and Partial Import/Export: Developers can take a copy of their current production version and build on top of it. Once modifications are complete, they can import the changes back into the production version using the Partial Import feature.
- Full and Partial Publish: After importing the latest changes, developers can publish the changes as a full publish or publish the changes alone.
These features enable collaborative work and help manage CI/CD pipelines for larger teams.
Best Practices
Always export the current published version and make changes on top of it
We strongly recommend that before starting the import/export process, always ensure that the bot is functioning properly over the desired channels.
The XO Platform has many dependencies, including:
- Sub-Dialogs present in a main Dialog
- Reusable Nodes shared across Dialogs
- Unique Dialog Names (no two Dialogs can have the same name)
Each Dialog has a unique internal identifier used by the system to track and map. It’s recommended to always export the latest version of the Bot with all dependent Tasks and build changes on top of it. This ensures you have the latest identifiers of the components from the backend, which helps with easy import of the latest changes.
While importing as well, import one Bot at a time to Bot2. This ensures we have all Tasks and configurations serialized in a specific order.
Single Environment Customers
-
Export the latest Published Version of the Bot (Bot1)
-
Import Bot1 as a new Bot (Bot2)
-
If there are more teams working, import Bot1 as Bot3, Bot4, etc.
-
Make changes to Bot2, Bot3, and Bot4
-
Merge the changes by exporting from all newly created Bots and importing (with all dependent tasks) into one (e.g., export Bot3 and Bot4 changes, then partially import into Bot2)
-
Import one bot at a time
-
Test Bot2 thoroughly, then export and fully import into the production Bot (Bot1)
-
Repeat the cycle for any new changes
Multi-Environment Customers
- Export the latest Published Version from the Production Environment as Bot1
- Import Bot1 into the Staging/Test Environment as Bot2
- Each team can import Bot1 into their Development Environment as Bot3, Bot4, Bot5, etc.
- Make changes to Bot3, Bot4, Bot5
- Export the copies of Bot3, Bot4, Bot5 (with dependent tasks) and partially import into Bot2 in the Staging/Test Environment
- Test Bot2 thoroughly, then export and fully import into the production Bot (Bot1)
- Repeat the cycle for any new changes

Advantages of this Approach
- Maintaining the reference ID of Dialogs helps with easy import of new changes.
- The Test copy (Bot2) helps validate that the changes are properly imported and working as expected.
- Fully importing Bot2 into Bot1 adds the latest changes without issues.
Dos and Don’ts
-
Do not manually change the name of the Dialog in the Development copies of the Bot (e.g., Bot3, Bot4, Bot5). Always change the name in the Test copy (Bot2) that will be fully imported into the Production version (Bot1).
-
If you must import a dialog task without the dependent tasks, first disassociate the dependent tasks from the flow, ensure no sub-intents are mapped to amend entities, and node-groups, and manage interruptions settings of the bot. Clean up stray nodes that are not connected to the flow Or are not required.
-
Try to do a Full Import and Full Publish of the Bot with the latest changes as much as possible.
-
Always prefer to import a dialog along with dependent tasks.
-
If you must import a dialog task without the dependent tasks, first disassociate the dependent tasks from the flow, ensure no sub-intents are mapped to amend entities, and node-groups, and manage interruptions settings of the bot. Clean up stray nodes that are not connected to the flow Or are not required.
Dependent task settings while exporting the bot for reference
Bot Management: Export, Import, Publish & Restore Guidelines
1. Exporting a Bot
- Safe Full Export/Import:
○ Allowed when bots share the same origin (no divergent histories)
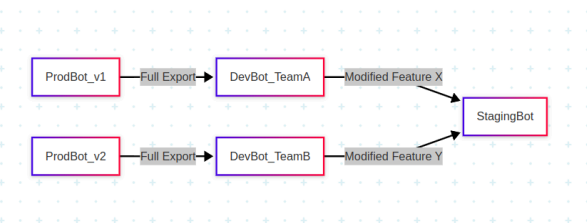
2. Conflict Prevention:
○ Always derive team bots from the same production version
Never merge bots with different lineage
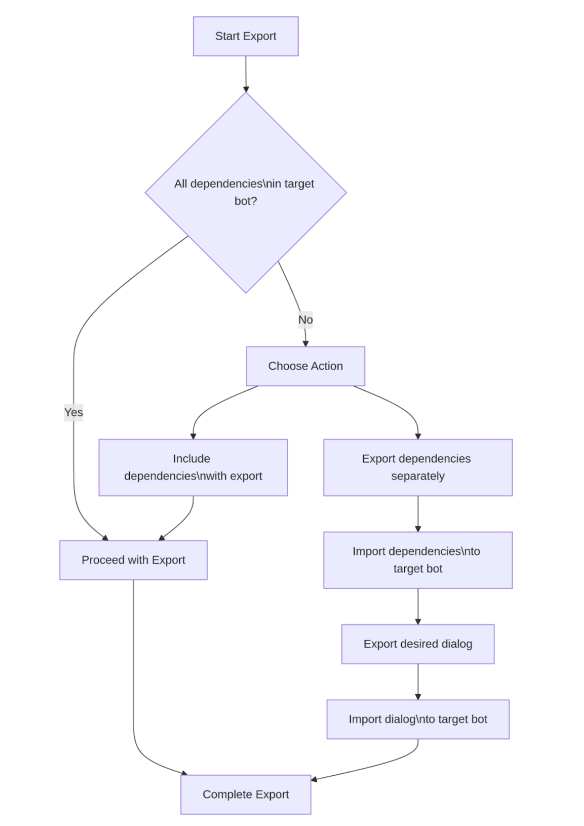
Partial Exports (Exporting Without Dependencies)
When performing a partial export (exporting only selected components without dependencies), ensure that all required dependencies (e.g., dialogs) are available in the target bot. Missing dependencies may cause errors when importing or publishing.
Best Practice:
● Before exporting, verify that the target environment has all necessary components.
● If dependencies are missing, either include them in the export or First, export and import the missing dependencies. Then, perform the actual import of your main
components
2. Incremental / Partial Import
When importing bot components incrementally (e.g., adding new / updating dialogs toan existing bot), follow these guidelines:
1. Ensure Dependencies Are Available
○ The target bot must contain all required dependencies.
○ Missing dependencies may cause broken references or runtime errors.
2. Maintain Consistency Across Environments
○ If you are developing bots across different environments (e.g., Dev, Test, Prod), derive all bots from a common parent bot when working on the same dialog tasks.
○ This ensures consistent references and prevents conflicts.
Why This Matters:
● Without a shared parent bot, references may break, leading to errors in bot behavior.
● Keeping a single source of truth (parent bot) ensures smoother updates and imports.
3. Publishing a Bot
Before publishing, perform these checks to avoid issues:
1. Check for Stale Dialogs in Bot Events
○ Ensure no outdated or deleted dialogs are referenced in bot events.
○ Remove or update any invalid references to prevent errors.
2. Verify All Dependencies Are Present
○ Confirm that all dependent dialogs and components exist in the bot.
○ Missing dependencies can cause publishing failures or runtime issues.
Successful Publishing:
If there are no referential issues and all dependencies are available, the bot will publish
smoothly without errors.
4. Bot Restore: Caution & Recommendations
Instead of relying on the Restore functionality, proactively maintain versioned backups of your bot.
● Backup imports are safer for reverting to a stable state.
Best Practices
-
Regular Backups
○ Export a full backup of your bot before major changes. -
Recommended Recovery Process
If you need to revert because:
The wrong bot version was imported/published, OR You want to return to a previous stable version
Follow these steps:
- Use your backup copy
- Perform a full import of this backup
- Publish the clean version
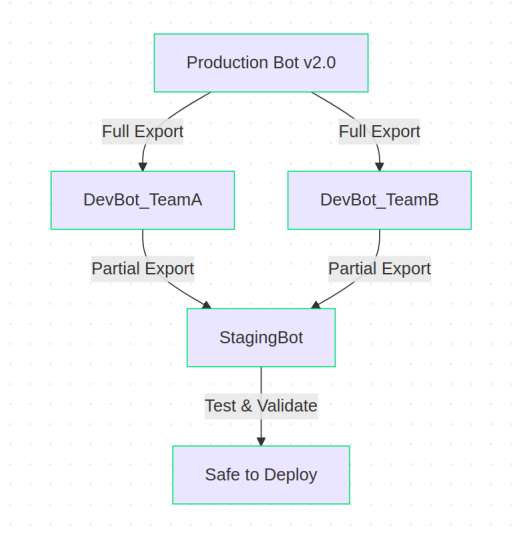
5. Workflow for Single Environment Setup
-
Export from Production
a. Export the latest published bot from Production (e.g., MainBot). -
Full Import into Development
a. Full Import into the existing Development Bot (DevBot).
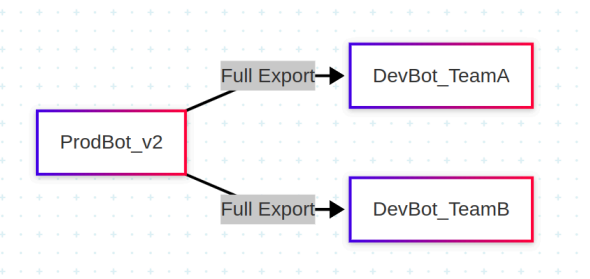
b. (For multiple teams: Create team-specific bots like DevBot_TeamA,
DevBot_TeamB by importing MainBot again.) -
Teams Work in Isolation
a. Each team modifies their own dev bot (DevBot_TeamA, DevBot_TeamB). -
Merge Changes into Staging
a. Partially export changes from each team’s bot.
b. Partially import into a shared Staging Bot (StagingBot).
c. Import one team’s changes at a time to avoid conflicts. -
Test Staging Thoroughly
a. Test StagingBot to ensure all changes work together. -
Deploy to Production
a. Once verified, fully export StagingBot and import into MainBot
(Production). -
Repeat for Updates
a. Restart the cycle for future updates